|
|
Post by RobHowdle on Sept 5, 2019 21:24:11 GMT
Hello! So I'll stick this one here as well as a link to my facebook page which will have more regular updates. I've been working with Doug from the US on the 3D files, rather he has been creating them and I've pretty much beta tested them haha. So far I am 95% of the way through the head, I just need to print the rear part of the main eye and the upper plate. The ideas we have for this is firstly to keep the head as light as possible, T3 is able to rotate the same as R2 however he can tilt his head up and down as well as pivot slightly left and right. It's taken a lot of work and we think we are on the right track to make this a reality! I've got a couple of changes I would make personally to my droid, such as once the outer plate is printed I'm going to see if I really need the inner plate, if I do I will stencil it out on a sheet of styrene since I printed it in 4 parts and glued it together but the only problem is, it's probably 1mm or less in thickness so it's really flimsy until it's stuck to the outer plate. I have had to slice all of the files pretty much as I have a CR-10 printer and I don't really like prints going longer than 12 hours as a rule so I've sliced them down and will make these available to anyone who wants them. Here is my current progress. 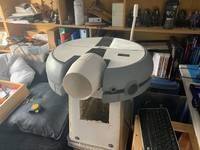 You can check out more on my Facebook page. www.facebook.com/robst3m4buildThanks Rob |
|
|
|
Post by RobHowdle on Sept 8, 2019 13:55:06 GMT
Got the main eye finished. Once the glue fully cured I'll give it a sand and start the filling and sanding process  Only thing left to do is to print the upper plate but I'm going to hold off on that I think while I work on some more parts for the eyes to hold the neo pixels. the holder I printed for the large eye came out perfectly, a few tweaks I will eventually make but it's spot on as well as the homemade diffuser.  Here is a quick video showing the holder. And then one of the diffuser. More to follow! Cheers Rob |
|
|
|
Post by RobHowdle on Sept 20, 2019 7:42:49 GMT
So I attempted to give the head a bit of a spray, Nero's coat with him being a German Shepherd is mostly black with plenty of browns and a yellow-y gold ish colour. I tried to see if anyone was able to help with the colours but nothing came of that one sadly so I'm kind of eyeballing it! Ran into my first mishap painting wise, one that I didn't encounter (or at least I don't think I did) on R2 is damp in the air! with the summer now drawing to a close here in the UK, everywhere is getting colder, the air is getting damper ready for Autumn/ Winter and I didn't take this into account due to when I started painting the head yesterday it was still warm, the painting spilled over into the evening when it got colder and sadly this affected the head. I used Wilko's own brand Gloss Black, same brand I used for R2 and it gave me some great colours and what I think was rather accurate and it was a little bit cheaper than Rusto-o-leum paint, it bonds well and if used correctly can give a real good finish, I'll post a picture of my R2 dome which used the Wilko's blue and metallic silver. After asking around it seems that this problem requires re-sanding and re-painting. I'll post a better picture tonight but the problem is that some of the head has dried and instead of a glossy finish it has given a matt black type of finish which looks like and I'd be happy with that (even though I used gloss spray paint!) but other parts have dried with a glossy/ wet type of finish, you know that look when you have just finished spraying and it's all wet? Yeah that kind of finish which is also nice. The crazy thing is, the finish is actually growing on me, I'll post a picture of my dog so you can see what I mean but in some lights he looks like he has a really shiny coat but in other lights is does look quite matt. Because of this I'm a bit torn whether to make it a completely shiny gloss head or leave it as it is... My Dog - Nero  R2 Dome  T3 Paint  I'd be interested to hear your thoughts on this, as I say I will try to post a better image when I get back from work as you can't really see the matt or glossy parts in the above image Cheers Rob |
|
|
|
Post by RobHowdle on Sept 22, 2019 17:00:54 GMT
Quite happy to say that the painting went pretty well, not 100% exact but I'm happy with it Here's a video of the paint job. Here's a video of the eyes working all with the diffusers, Love to get peoples thoughts Cheers Rob |
|
|
|
Post by RobHowdle on Dec 27, 2019 10:12:01 GMT
Bit more progress, I’ve started adapting the Padawan360 for T3, comes with lots of sounds! After searching high and low for sounds all I found were about 26 decent ones but since R2 has tons of sounds it seems a bit rubbish wasting all that space. I went into the steam game files to copy them out to find that the wav files weren’t audio files but instead files that called hexadecimal code to produce audio within the game only. After about 2 hours of digging I found some code in the form of a .sh file that ran as a BASH command and converted all the files to mp3 so we now have nearly 100 files of audio for T3. Next problem is that there are now too many files for the 360 controller so I’m currently adding to the code to use new trigger to produce the sounds which for me is trial and error and a lot of swearing. Here is a video of the sounds currently. youtu.be/PuVVE3wPVmMI am also working on V2 of the lights for T3 since I really didn’t like the V1. Here’s a video of those! youtu.be/Bhg3m6qFKV4Cheers Rob |
|
|
|
Post by RobHowdle on Feb 5, 2020 8:43:36 GMT
Haven't been overly active on this build log lately. I wasn't too happy with the paint for the head. I spent so much time on the lower head getting the sanding pretty much perfect but the upper head I didn't spend as much time on which was my own fault, you'd have though I'd have learnt by now to take my time. I'm in the process of sanding down the main eye and the head again in order to repaint. The reason for this is as I said, I'm not 100% happy with the final look mostly because I think it can be better as well as the fact that I don't think I filled it enough because there were quite a few low points on the head whilst I was sanding which tells me it wasn't very even and flat/ smooth. Also some of the joins for joining the head parts together had become visible after the paint had cured. I possibly didn't let the primer dry long enough originally since it didn't come up when I primed it but at the same time, when I was painting it I had just threw loads of different paint on to get that overlaying effect without letting it dry too much as I was going for that overlaying smeering type of look with the purpose to not fully cover everything and have the different paint come through. Perhaps that wasn't the best thing to do on this or perhaps my methods on doing it wasn't the best. I need to go through and finish sanding the whole head before getting some more filler, filling these low points, refilling the join lines and then sanding back so it's nice and smooth. It sucks because I have to do it for the bottom head as well but that should just be a case of sanding the paint off. That puts me off in a way because there is so many paint layers on there it takes ages to sand off but it's all a learning process I guess!  |
|
|
|
Post by RobHowdle on Apr 13, 2020 22:37:50 GMT
13th April 202 Update There’s been quite a bit going on since my last update. To start with I’ve sanded back the paint on the head, I didn’t like that some of the join lines had started to become visible so I figured I hadn’t put enough filler on them. Sanding the paint off was a pain but I finally managed to get it all off, tricky to get the trench sanded, I call it the trench because it reminds me of the Death Star trench. Sanding and filling took a while and I’m still not overly happy but I have just ordered some motip spray putty which I’m hoping will be here soon. It’s mostly what looks like scratches but when I rub my nail over them I can’t feel them but they are visible so I’m hoping that this spray filler primer is enough to fill those up. Also there are what looks like tiny pin prick like holes in places that I can’t seem to get rid off by sanding so I’m hoping it fills those too. I’m unsure if I want to still go for my Dogs colour scheme, I may try to do it better this time but add more black to make it look a bit better since I used more brown last time, I wasn’t overly happy but I need to buy more clear coat to so I can get a bit more of a glossy shine afterwards. I gave it a spray of standard primer and I’m giving it a whole week to cure and basically see what it does.   The two images below (hopefully show the slight imperfections I have.   I also decided that I was going to do some slight filling on the bottom head but I’m going to cover it in a sheet of styrene instead. Nobody will really see the bottom but it will be slightly visible once the neck mechanism is installed.  Thanks Rob Sent from my iPhone using Tapatalk |
|
|
|
Post by RobHowdle on Jun 14, 2020 21:37:42 GMT
T3 is making progress! I had to give up sanding in the end because I was filling gaps, sanding them but then noticing the tiniest imperfections or gaps and it was getting stupid the amount I was sanding, I think it was my mind telling me it had to be "perfect" but what is perfect? I have enlisted the help of Mr Paul 'Wiz' Johnson who has made some absolutely stunning Graphic Artwork. If anybody has seen his work you will understand how brilliant it is! He is making a new, high resolution T3 3D Model for me, with my custom colour scheme and weathering. This will be the first time I believe will have a high resolution image of T3 which is pretty great. It's using reference images from both Doug's files a well as KOTOR 1 & 2 reference images.
I've been mostly getting rid of the old paint to refill and then finally go over with spray putty. Got that glass like touch finish again which I'm happy with. I need to finish the main eye, sand the large eye and sand it back a little, being able to be held in with friction is great but it messes up the paint. I'm tempted to order some of those lenses that Doug has, not sure whether I'd lightly sand the insides to give a frosted/ defused effect yet.
I've also been working on the top plate, as with everything on the left side of the head, something happened and it ended up out of alignment somewhere so I do have to hack a small part of the top plate and I need to sand back part of it that goes behind the main eye otherwise it doesn't sit right.
Not sure how I'll fit the top plate, I may just silicone it in to keep it down until I need in and I can just cut the silicone however I'd need to remove the main eye for that. I do have some tiny magnets I might be able to use but I have a feeling it wont work very well.
Thanks
Rob
|
|
|
|
Post by zahcstarkiller on May 13, 2023 4:14:21 GMT
Extremely cool stuff Rob! I just stumbled across this forum and had to join. I would like to build a T3 as KOTOR was a part of my daily life as a youngling. I have a few 3D printers and will be buying a Langmuir MR-1 CNC mill once my workshop is set up. I would really like to design and build an all aluminum droid! Of course, some parts like the head may have to be fiberglass or printed, but I digress. I will be looking for updates and would love to collaborate in the future!
|
|


 Only thing left to do is to print the upper plate but I'm going to hold off on that I think while I work on some more parts for the eyes to hold the neo pixels. the holder I printed for the large eye came out perfectly, a few tweaks I will eventually make but it's spot on as well as the homemade diffuser.


